Tweets
Replying to @josecastillo
I could not help myself. Stayed late at the shop to finish the #RC2014 build, and now I have the biggest smile on my face. I didn’t know I was going to test the final bring-up when I started filming this, but when nothing blew up I decided to just keep going and, well:
(original)
Replying to @josecastillo
That interview livestream was so wonderful! Will post another thread with the final link tomorrow. In the meantime! Building the #RC2014 serial module. And using my $10 USB fan for fume extraction. It may not be the best tool for the job, but it’s better than not doing the thing.
(original)
Happening now!! https://m.youtube.com/watch?v=jUJJAMM30IY
(original)
Replying to @josecastillo
also! I messed up the timezone math in my head. the Hackster Café chat was just under TWO hours away when I started this thread, which means it’s LESS THAN AN HOUR AND A HALF away now so I should probably really finish my notes (and tidy up my workbench?) https://www.youtube.com/watch?v=jUJJAMM30IY
(original)
Replying to @enzinolombardi
Haha no worries it’s all good, that’s why I included the wink
(original)
Replying to @enzinolombardi
hey, spoiler alert! ;)
(original)
Replying to @josecastillo
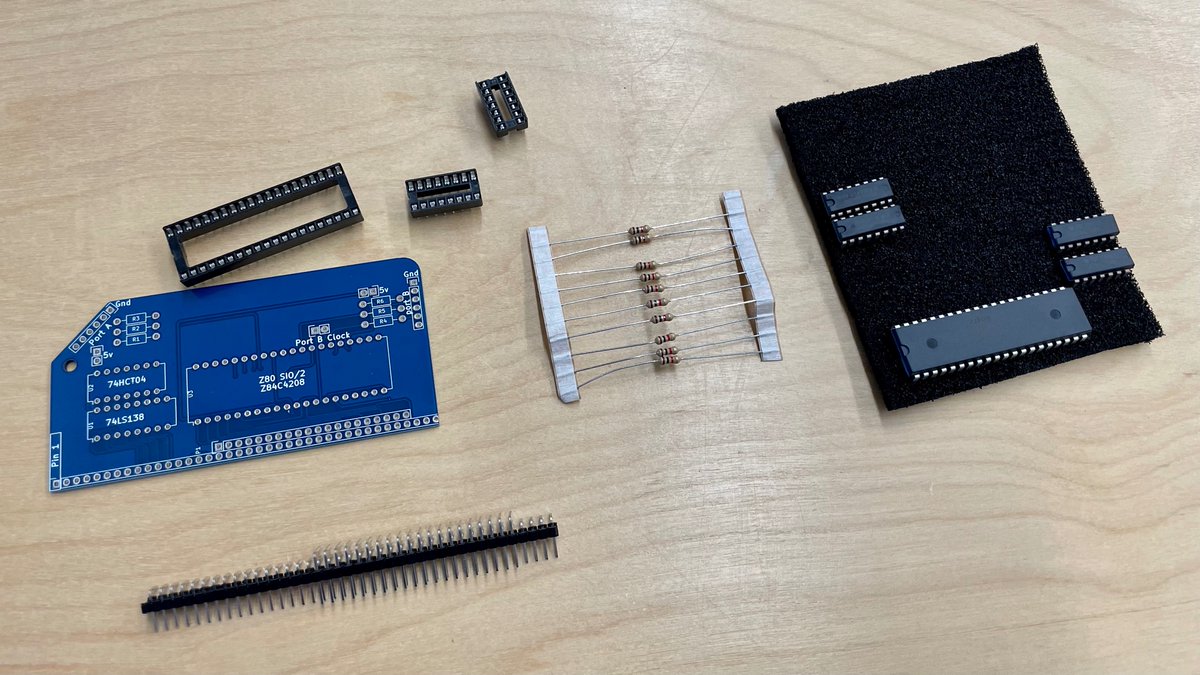
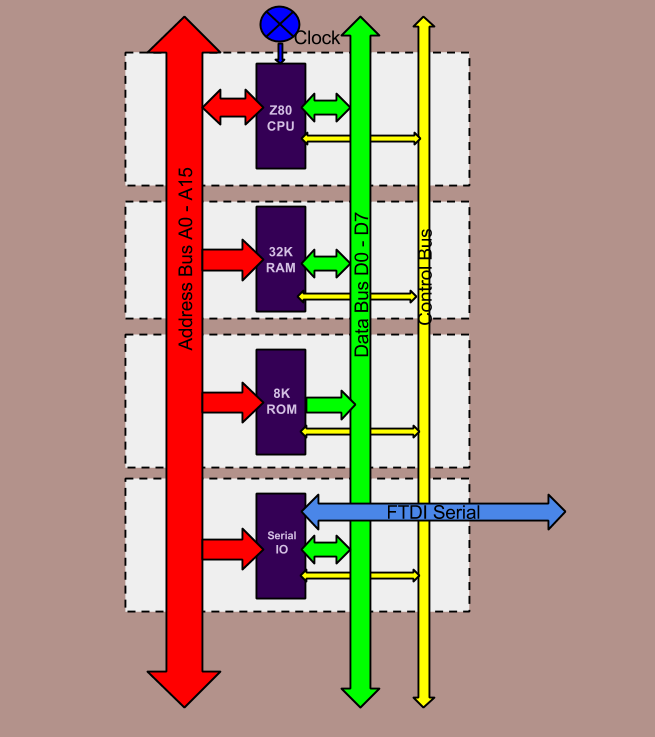
After all that, I still won’t be able to interact with it. That’s where the Serial module comes in. The CPU will be able to write values to a special part of memory that controls a link to the outside world. Just a stream of text. But at that point, I’ll have a working computer.
(original)
Replying to @josecastillo
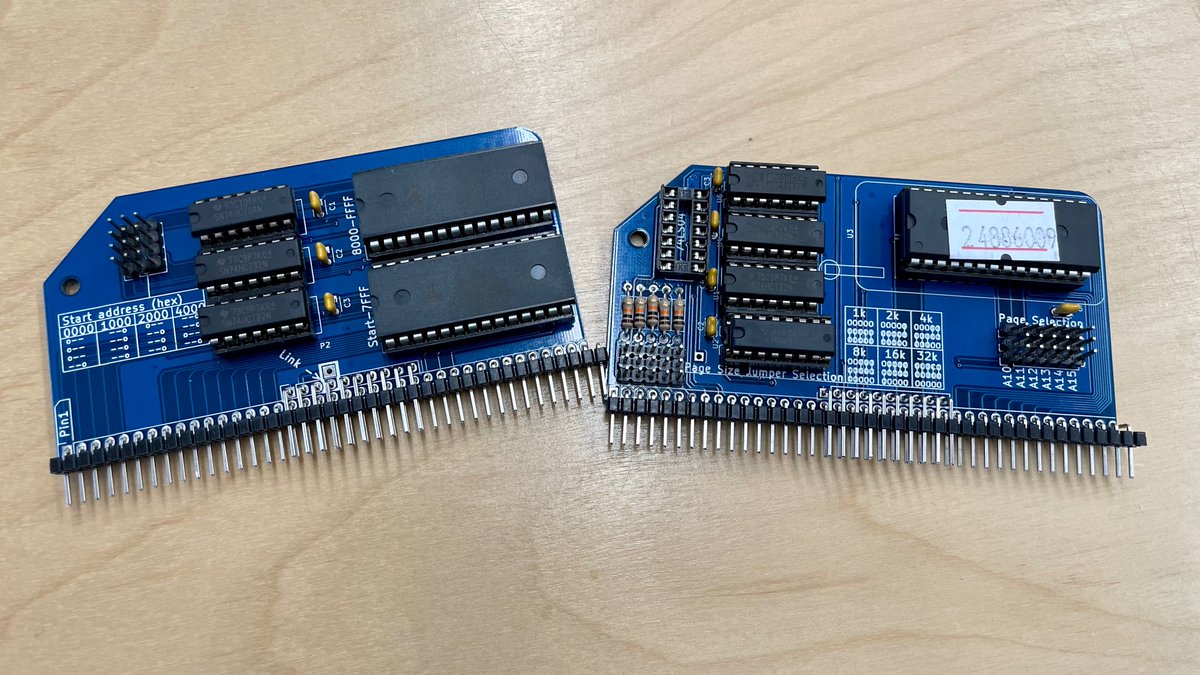
Next up are the ROM and RAM modules. Somehow the ROM module is going to “know” to respond when certain addresses are selected, and offer up the code that the CPU needs to do stuff. Same with the RAM module and the memory. I’ll write about these later. Then there’s one more.
(original)
Replying to @josecastillo
It does that by (hand waving away a couple of things) setting or reading the 1’s and 0’s of the eight lines of the data bus. This creates a number from 0 to 255. A byte! This is how the CPU interacts with the world (and the reason it wouldn’t do anything if I turned it on now).
(original)
Replying to @josecastillo
My layman’s understanding: the CPU can set each of the 16 address lines, and those 1’s and 0’s can create any number from 0 to 65,535. That’s an address, and if it matches up with some peripheral on the other end, the CPU can either write data to or read data from that address.
(original)
Replying to @josecastillo
In a modern microcontroller (or “System on a Chip like the Apple M1) all of these bits are integrated, and you don’t have to muck about wondering where your RAM is. But fundamentally, this mechanism is still there. This is the piece I’m stoked to get an intuition for.
(original)
Replying to @josecastillo
That’s because this CPU is just the “computey” part of the computer. It has no place to store code, and only a handful of bytes of memory (“registers”). All the fun stuff we want to do with it, we will have to accomplish by adding peripherals, and we do that using this mechanism.
(original)
Replying to @josecastillo
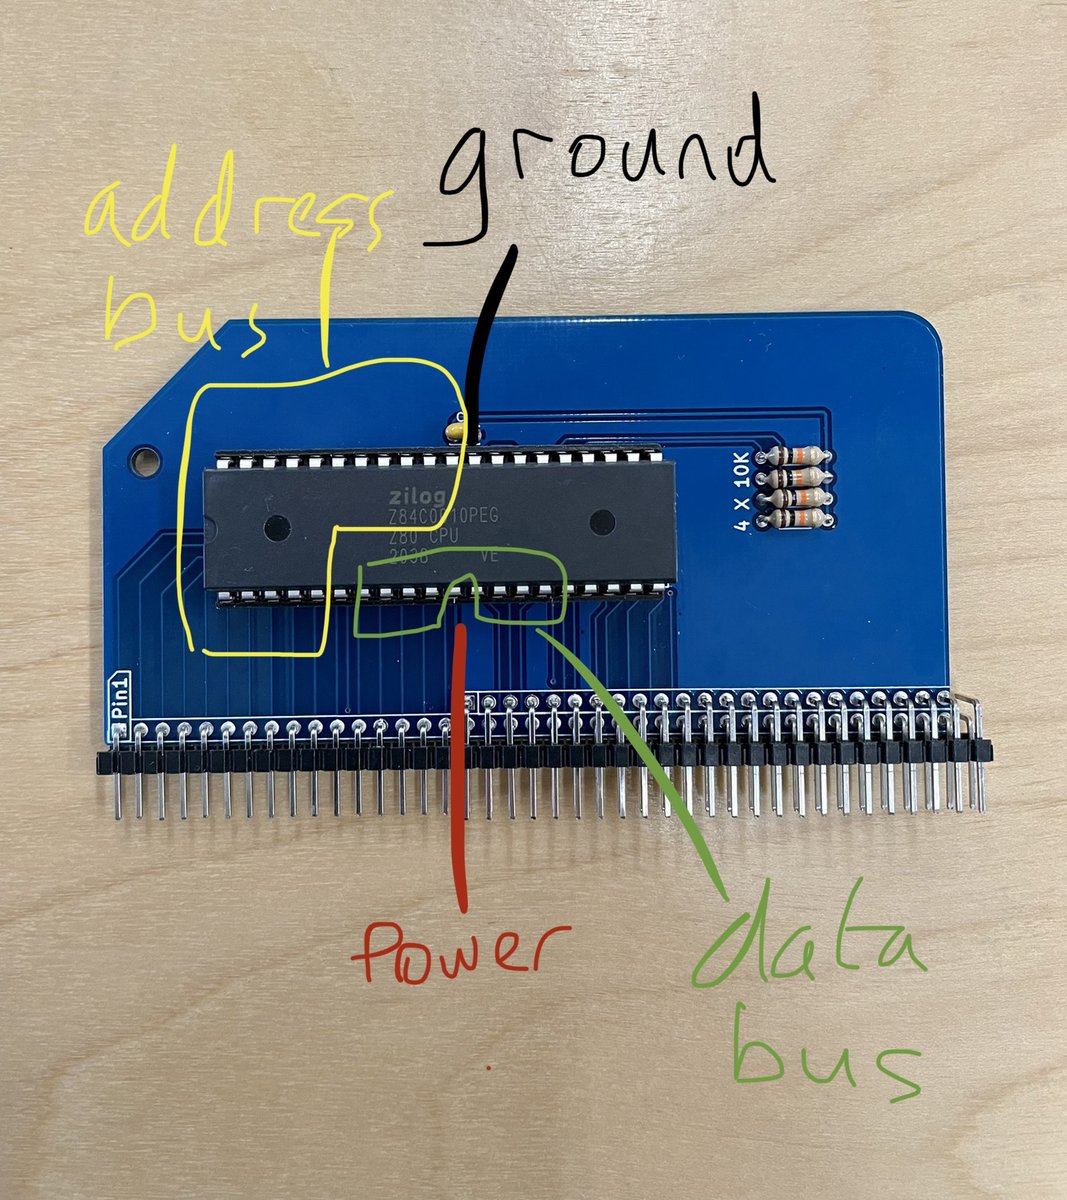
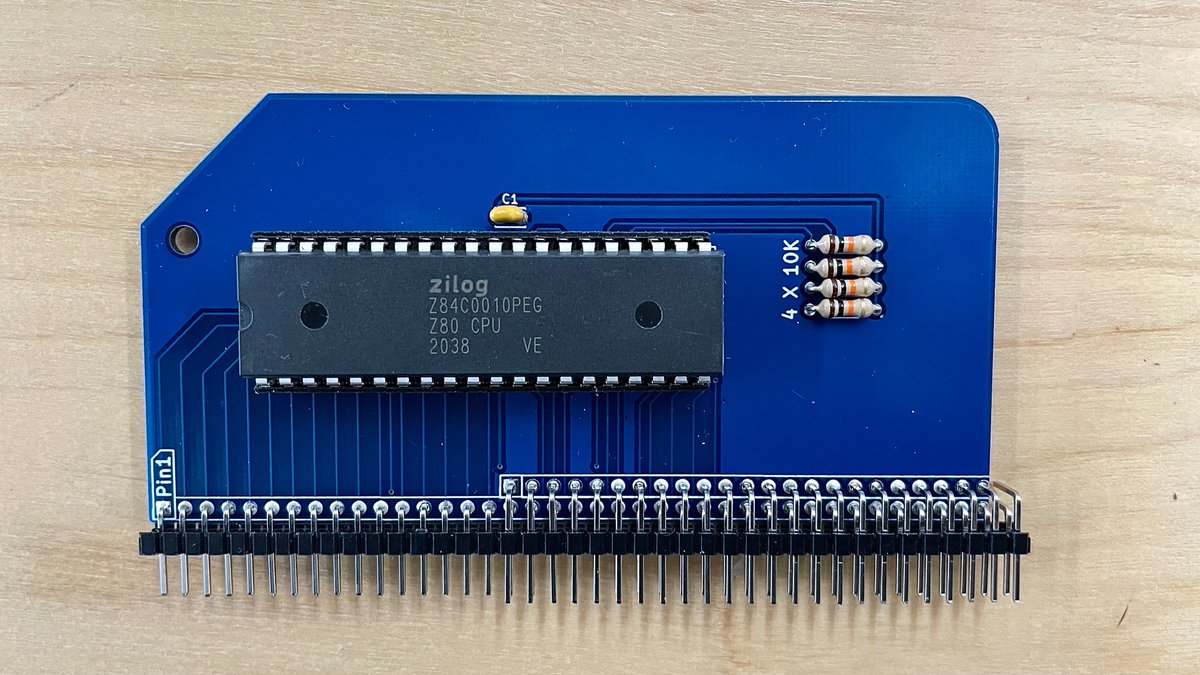
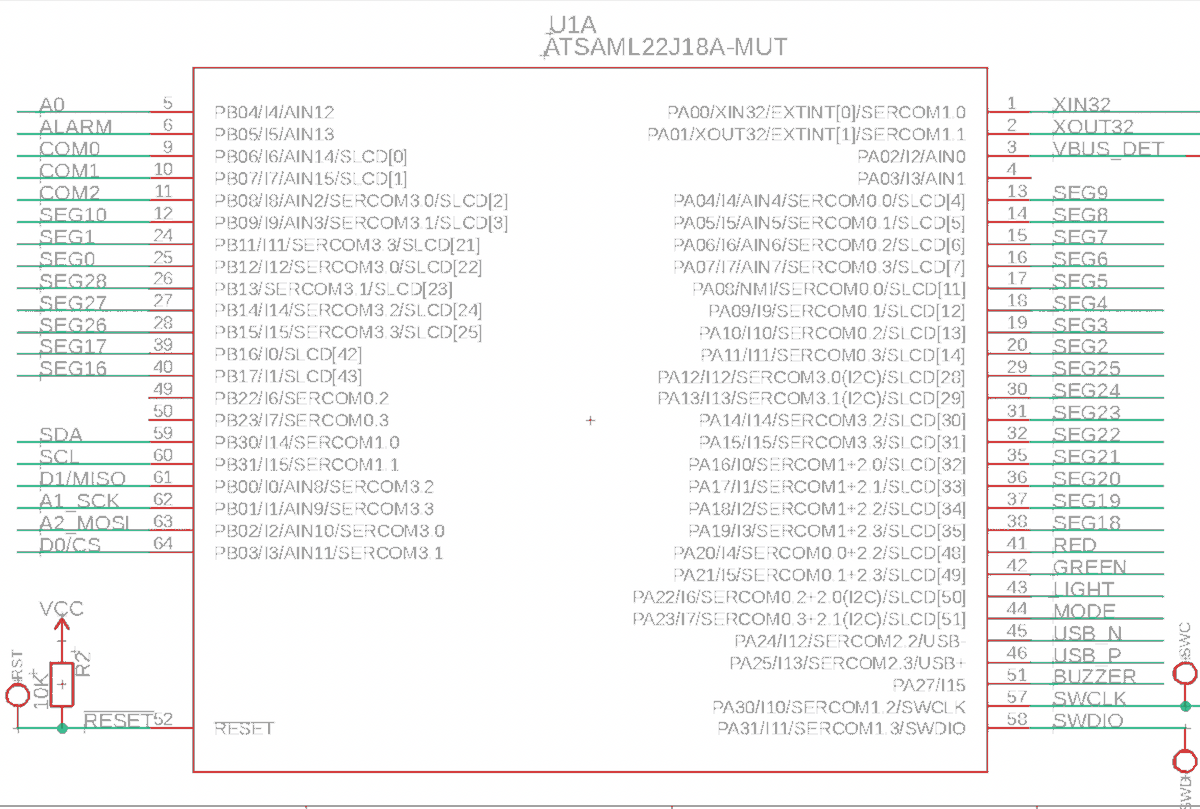
The CPU module is where this thing gets interesting — and different from the microcontrollery stuff I usually do. The pins on an MCU like the one on the watch are generalists. In contrast, almost all of the pins on this CPU have to do with either the address bus, or the data bus.
(original)
Replying to @josecastillo
Took the morning off to prep for my @Hacksterio Cafe chat with @glowascii (in just under three hours’ time! https://www.youtube.com/watch?v=jUJJAMM30IY) but I couldn’t help myself: a few more modules for the RC2014. First up: the CPU module. Some notes; thread-in-a-thread. 1/8
(original)
Replying to @JoseCastillo_2
I feel you, I’ve got the same angst over missing out on @joeycastillo, but at this point it is what it is 🙃
(original)
Replying to @_nitz, @Windows and @Microsoft
I exactly once got a “Siri Suggestion” for Burger King while walking around the city, and disabled that entire swath of functionality just to make sure it never happened again. Still don’t know if Apple approved this advertising or if BK was gaming the system, but it’s offensive.
(original)
Super stoked to share this! Tomorrow/Tuesday at 1PM Eastern (10AM Pacific) I’ll be chatting with the brilliant @glowascii on Hackster Café to talk open source e-books, retro Casio watch hacks and various lessons learned building these oddly specific objects. Hope you can join us! https://twitter.com/Hacksterio/status/1391930544322224128
(original)
for _dayjob these days I am working extensively with SwiftUI and I have to say: I’m sold. bindings are magic, and if you take a disciplined approach to what you’re doing, it feels like your entire application emerges like a fully formed, well articulated thought. Apple nailed it.
(original)
Replying to @anachrocomputer and @ZxSpectROM
I may have knocked the focus dial accidentally… either that or the intensity is causing an blooming artifact in the video, but it does focus fine :)
(original)
Replying to @josecastillo
I also chose it because I knew could see if I’d succeeded without having to build any other modules: using that lovely classic Tektronix scope by my workbench, I can see that I have a signal, and it looks very much like a clock!
(original)
Replying to @josecastillo
First #RC2014 module built! I figured the best place to start was the clock module. It’s not a clock like you’d think of a wall clock; it’s more like a metronome. In order for the computer to do stuff, the CPU needs a clock signal rising and falling. That’s what this board does.
(original)
Replying to @cynorg and @kfury
That’s the one.
(original)
Replying to @kfury
I have witnessed exactly one mass shooting in my life. It was at 34th and 6th, and it involved ostensibly well-trained NYPD officers discharging bullets into nine innocent bystanders. I’ve been skeptical of the good guy with a gun ever since.
(original)
Replying to @theavalkyrie
Your code is on Mars, and you’re still writing code. My 13 year old self is knocked entirely over by this.
(original)
what a year it has been.

(original)
Replying to @mattk
I’m using an Atmel Power Debugger, on loan from a colleague. https://www.microchip.com/DevelopmentTools/ProductDetails/ATPOWERDEBUGGER
(original)
Replying to @josecastillo
hmm. The code works, but seems to reset frequently. Only in PL0, though. Still, today was a good day: got power consumption down from 100µA to 30µA, and glimpsed the possibility of 12µA. this looks like battery life from 20 to 50 weeks of normal operation.
(original)
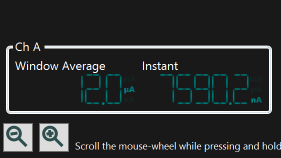
Replying to @josecastillo
Are you hecking kidding me? Lowered my performance level to PL0 and disabled the performance level mechanism. 12 µA average, and the power debugger has taken to displaying my instant power consumption in *nanoamperes*! This is a good number. Let’s put it on the watch.
(original)
Replying to @josecastillo
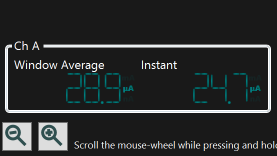
turning on the LCD controller brings me to 28.9µA. The screen’s not attached, but it’ll add a couple of µA probably. bottom line, this is pretty dang close! let’s see what we can do.
(original)
Replying to @josecastillo
calendar and buttons enabled. 26µA. screen next.
(original)
Replying to @josecastillo
well that was a freebie. I could have sworn I unchecked this checkbox. anyway back down to 3.5µA with no functionality enabled. let’s work our way back to a working gadget.
(original)
Replying to @josecastillo
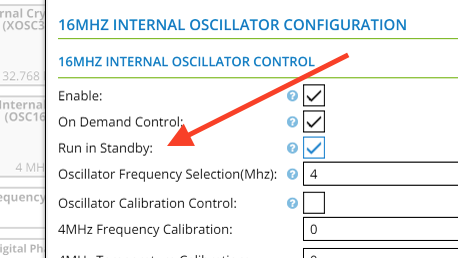
…either that, or, the main clock isn’t shutting down when I go into standby. it runs at 4 MHz, and the data sheet suggests that the SAML22 uses 39µA / MHz. 39 * 4 is suspiciously similar to the number I’m seeing.
(original)
Replying to @josecastillo
well that didn’t take long. uncommenting _mclk_init is enough to bring my power consumption up to 147 µA. my sense: something about my clock configuration is making the watch consume too much power. this is good. this is a starting point.
(original)
Replying to @josecastillo
late start. but ok. with literally everything commented out except for while(1) sleep(4), I’m at just about 3.5 µA (assuming 3V, which is what the coin cell should offer). let’s start hanging some ornaments on the tree.
(original)
Replying to @josecastillo
anyway. heading into the shop now to continue the quest for lower power consumption. last weekend I got to 100µA. my goal is to get below 25. the plan: turn modules off one by one to see where that power consumption is coming from.
(original)
Replying to @josecastillo
as of now, the only external wake pins are on the flex connector inside the watch, which means a sensor with an interrupt pin can wake it from this deepest of slumbers. but there’s one pin near the button on the right that also has this functionality; I’d be a fool not to use it.
(original)
Saturday watch thread: after review, I am going to do one more spin of the board before making a run to share. A tiny change. But in moving this signal over, one of the buttons becomes an external wake pin. This will allow me to use the BACKUP mode for the deepest possible sleep.
(original)
Replying to @ptdecker, @ZxSpectROM and @ben_eater
down into the rabbit hole, one step at a time :)
(original)
Replying to @Poddster and @ZxSpectROM
In terms of online resources, it has what I like to refer to as ‘relentless documentation’; before I ordered I delved into so many details about each module I was getting, things other folks had built, and notes on designing add-ons (which I may yet do!) https://rc2014.co.uk/
(original)
Replying to @josecastillo
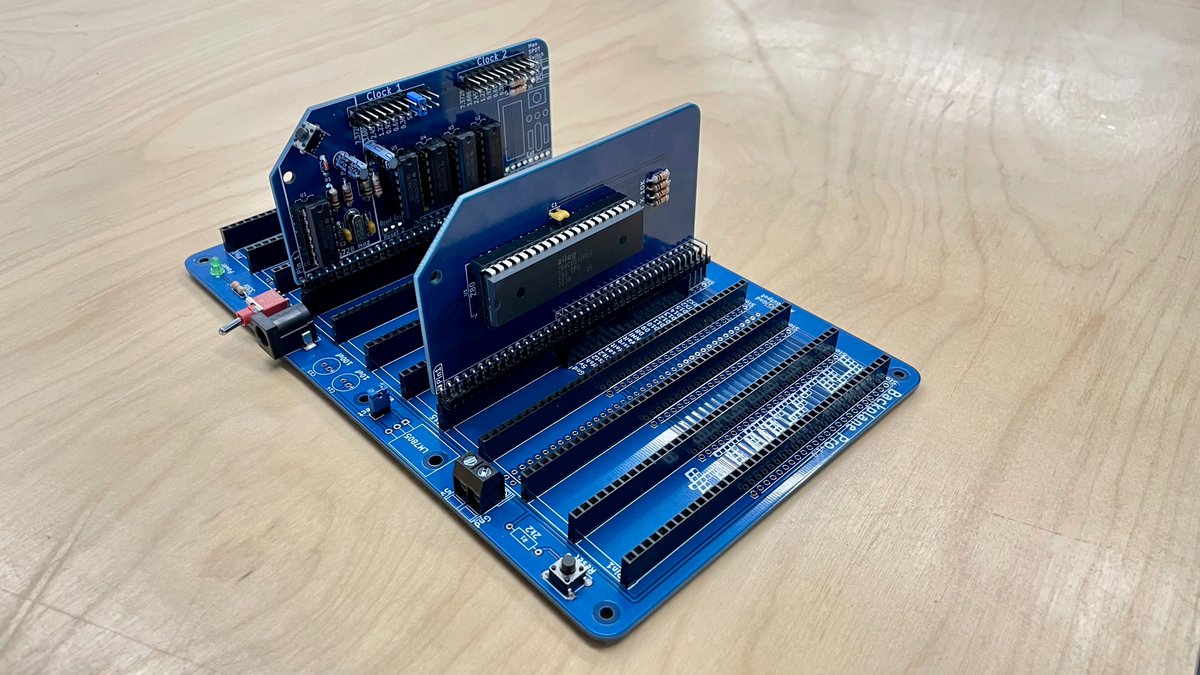
in spare cycles over the next few weeks, I’m going to assemble this computer piece by piece in order to understand things more deeply. today: the backplane. All the different parts of the computer — CPU, RAM, disk drives, etc. — will plug in to this board that connects them all.
(original)
so I have an embarrassing problem: I work with computers, but I have no idea how they work. for someone who strives to understand things this is an unacceptable state of affairs. So I have ordered this #RC2014 kit from @ZxSpectROM. it’s a DIY build-your-own retro computer kit. 🧵
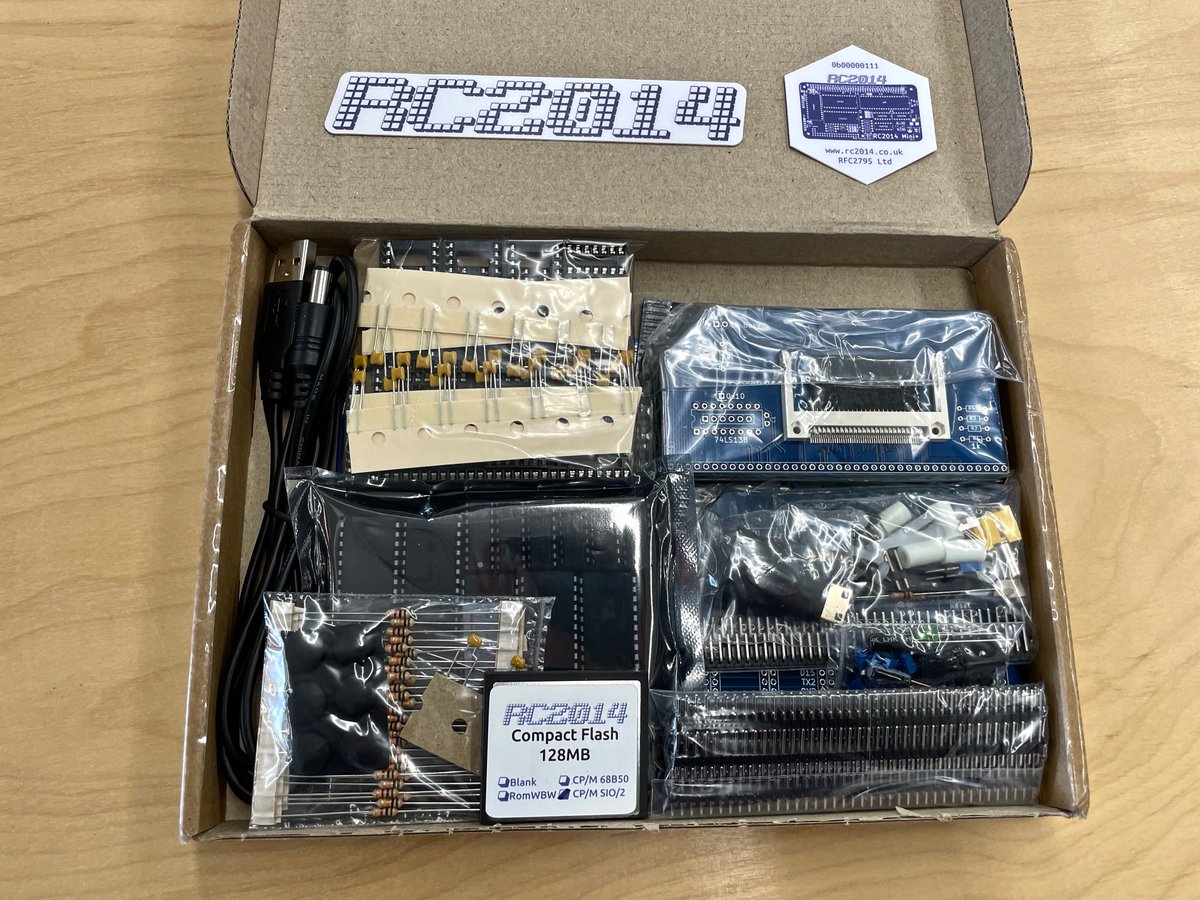
(original)
As a user, I want to
• receive unsolicited “Slack Tips and Tricks” emails
so I can
• say “how fucking dare you” out loud to my telephone.(original)
Replying to @av1d508
Not at this time; I’m just reusing the standard F-91W LCD! I do have an idea for a custom LCD, but that’s a later idea; first I want to get some of the watch PCB’s built and in people’s hands. https://mobile.twitter.com/josecastillo/status/1368584803314962434
(original)
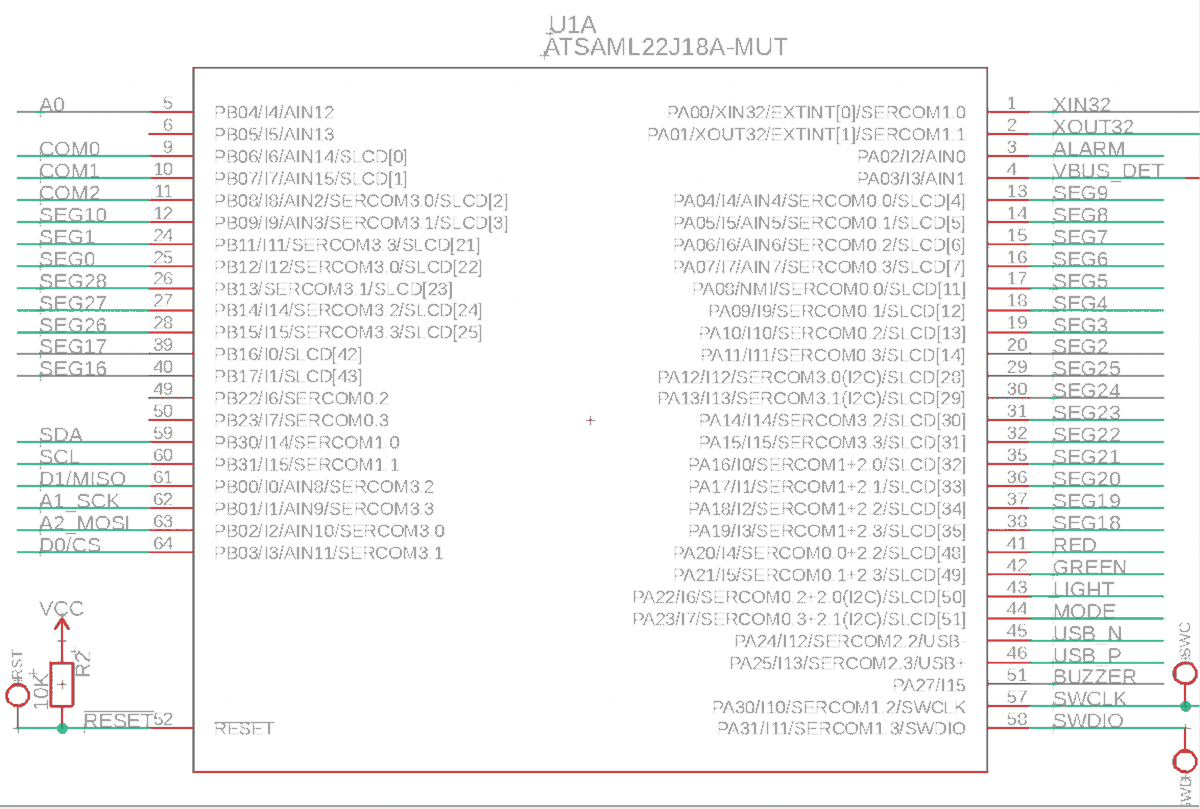
Replying to @josecastillo
then again to some extent I think this pinout was inevitable; given the number of LCD segments I had to map, the I2C pin constraints, and the desire to have a SERCOM and three analog pins on the flex connector, i don’t think i could have laid it out it any other way.
(original)
Replying to @josecastillo
(I should give myself a little credit: I noticed that three of those pins had some RTC-related functionality, which is why I put them on the flex connector. But I didn’t fully understand their potential, and it’s 50/50 luck that one of the accelerometer interrupts matched up 🙃)
(original)
Replying to @gennyble
Honestly with the design I ended up with, it’s reasonably hard to solder. I am hoping I can make a few batches of them by hand here at the shop, but I designed it with an eye toward inexpensive manufacturing. because I agree, it’s a very fun platform to play with wearable code :)
(original)
Replying to @gennyble
It kind of makes sense; imagine a punch-clock at a factory or a data logger on a fleet vehicle. you need accurate time, and you also probably want to know if someone tried to mess with it. (also any movie-prop time-bomb needs at least four blue wires, haha)
(original)
Replying to @josecastillo
The INT2 line from the low-power accelerometer connects to an RTC input pin. If I can use the pin this way, it means that with the flexy accelerometer addon, I could put the watch into backup mode when the user puts the watch on a nightstand and wake up when they pick it back up.

(original)
Replying to @josecastillo
but! a line I overlooked when reading this the other day. The RTC has a feature called tamper detection. You can wire certain pins to a sensor to detect, say, physical intrusion. Importantly: the RTC can fire an interrupt when it detects a tamper event! https://twitter.com/josecastillo/status/1388918718353350657
(original)
Replying to @josecastillo
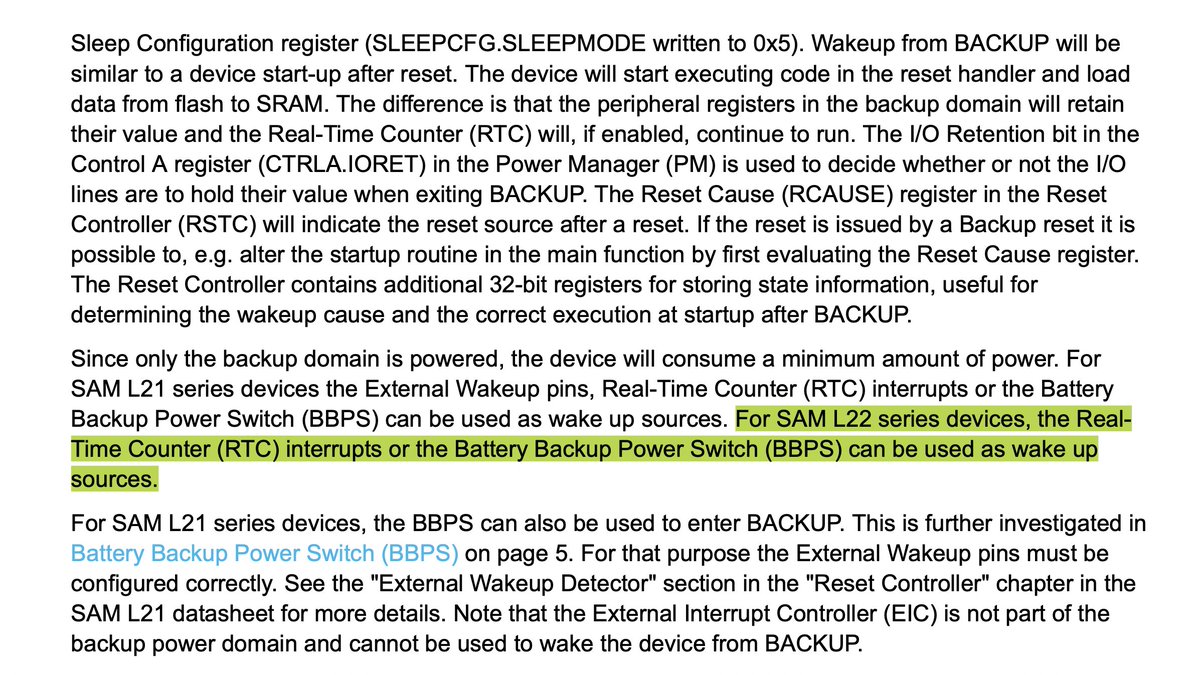
BUT! There is that backup mode. It’s SUPER low power, but alas, on the L22, external interrupts like button presses can’t wake up the microcontroller from that mode; in my case, only the real-time clock can do it (i.e. sleep in BACKUP until an alarm; then wake up to handle that.
(original)